
When building web applications, it’s common to redirect users after authentication, authorization checks, or specific actions. A frequently asked question is:
“Is there any other way of storing redirectUrl other than using a session?”
The short answer is yes. While sessions are one of the most common solutions, there are several alternatives depending on your application’s requirements.
In this article, we’ll explore different ways to store a redirectUrl, along with their advantages and disadvantages.
What Is redirectUrl?
A redirectUrl is simply the page you want a user to return to after completing an action.
For example:
- User tries to access:
/dashboard
- User is not logged in.
- Application redirects them to:
/login
- After login, they are redirected back to:
/dashboard
The application must temporarily store the original URL somewhere.
Method 1: Store redirectUrl in Session
This is the most common approach.
Example:
req.session.redirectUrl = req.originalUrl;
After login:
res.redirect(req.session.redirectUrl);
Pros
- Easy to implement
- Secure
- Hidden from users
Cons
- Requires session storage
- Doesn’t work well in fully stateless architectures
Method 2: Use Query Parameters
Instead of storing data in a session, append the URL directly.
Example:
/login?redirect=/dashboard
After login:
const redirectUrl = req.query.redirect;
res.redirect(redirectUrl);
Pros
- Simple
- Stateless
- Works across servers
Cons
- Visible in URL
- Must validate carefully
- Can be manipulated by users
Method 3: Hidden Form Fields
You can store the redirect URL inside a login form.
<input
    type="hidden"
    name="redirectUrl"
    value="/dashboard">
After form submission:
const redirectUrl = req.body.redirectUrl;
Pros
- Easy implementation
- No session required
Cons
- User can modify form data
- Requires validation
Method 4: Cookies
Store the redirect URL in a cookie.
Example:
res.cookie(
    "redirectUrl",
    "/dashboard"
);
After login:
const redirectUrl =
    req.cookies.redirectUrl;
Pros
- Persists between requests
- Easy to access
Cons
- Client-side storage
- Requires security precautions
Method 5: JWT Payload
In stateless authentication systems, you can temporarily include redirect information inside a signed token.
Example payload:
{
  "redirectUrl": "/dashboard"
}
Pros
- Works well with microservices
- No server-side session
Cons
- More complex
- Token size increases
Method 6: Browser Storage
Modern web applications can use:
localStorage
or
sessionStorage
Example:
sessionStorage.setItem(
    "redirectUrl",
    "/dashboard"
);
Retrieve later:
const redirectUrl =
    sessionStorage.getItem(
        "redirectUrl"
    );
Pros
- No server storage
- Very easy in SPAs
Cons
- JavaScript dependent
- User can modify values
Security Considerations
Regardless of storage method, always validate redirect URLs.
Avoid:
https://evil-site.com
Instead, allow only internal paths:
/dashboard
/profile
/settings
Example validation:
if (!redirectUrl.startsWith("/")) {
    redirectUrl = "/";
}
This prevents Open Redirect vulnerabilities.
Which Method Should You Choose?
| Method | Best For |
|---|---|
| Session | Traditional web apps |
| Query Parameter | Simple stateless systems |
| Hidden Field | Login forms |
| Cookie | Temporary client storage |
| JWT | API-driven applications |
| Browser Storage | Single Page Applications (SPAs) |
Recommended Approach
For most applications:
- Use Session Storage if sessions already exist.
- Use Query Parameters for stateless applications.
- Use sessionStorage for modern React, Vue, or Angular SPAs.
The right choice depends on your architecture, security requirements, and scalability goals.
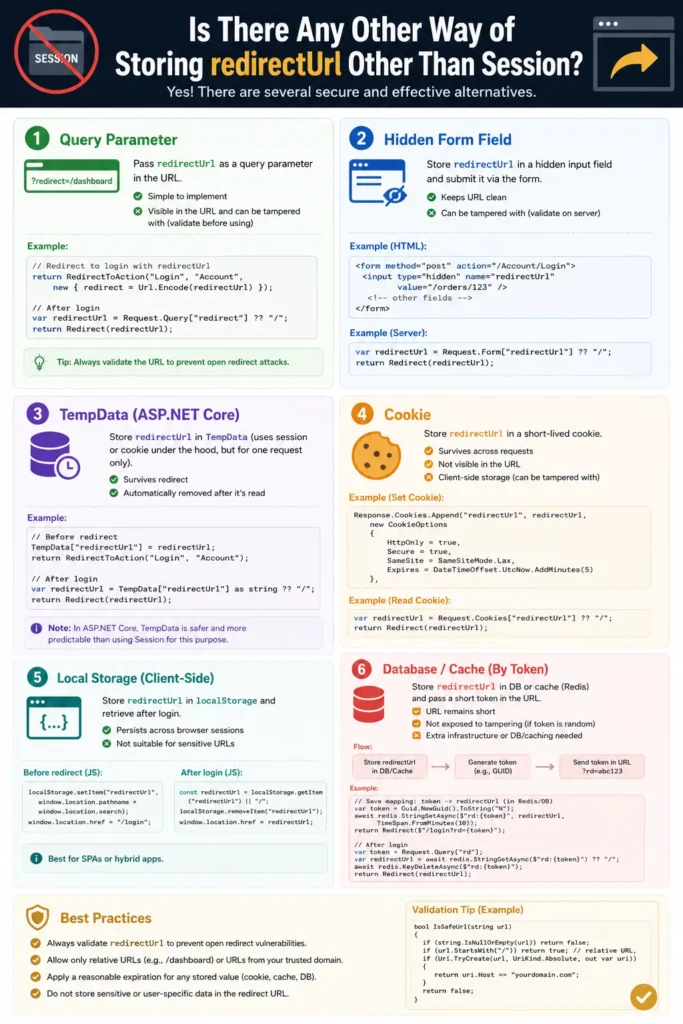
Infographic
Conclusion
Sessions are not the only way to store a redirectUrl. Depending on your application design, you can use query parameters, hidden form fields, cookies, JWTs, or browser storage.
However, no matter which method you choose, always validate redirect URLs before redirecting users. A small validation check can prevent serious security vulnerabilities and keep your application safe.
Happy Coding!